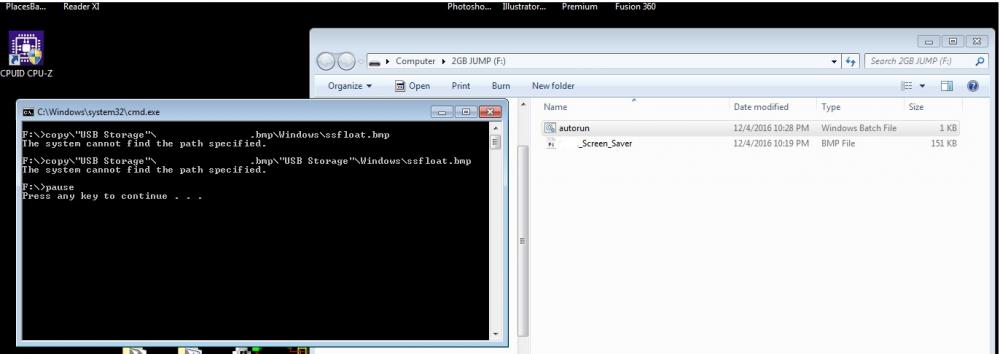
i wanted to change the little bouncy AB logo that comes stock on the panelview 600's to a company logo and in my searching on how to do so i found this on the web and tried to do it today and had no luck. i attached below the error message that im getting when i attempt to do this. looking for some advice as to what i may be doing wrong. when i plug the USB stick into the panelview the error i get is File Not Found, as apposed to the screenshot i attached where i have the USB stick plugged into my laptop. i have the autorun .bat file on the main directory of the usb stick as well as the .bmp file that im attempting to load as the screensaver.
28335 - Changing the Screen Saver Bitmap on PanelView Plus and VersaView CE
Changing the Screen Saver Bitmap on PanelView Plus and VersaView CE
Introduction
A bitmap image may be displayed when the screen saver activates. This image is randomly moved around the screen. By default the terminals have a bitmap named ssfloat.bmp which is used as the screen saver image.
This technical note describes how to change the screen saver image on the following terminals:
- PanelView Plus 400 - 1500 with Windows CE.NET 4.1
- VersaView CE 700 - 1500 with Windows CE.NET 4.1
Note: Previous terminals running an earlier version of Windows CE do
nothave the screen saver
imagefeature (e.g. PV+/VVCE with Windows CE 3.0). On these terminals, when the screen saver is activated, the display back light was simply turned off.
It is not possible to change the screen saver on PanelView Plus 400/600 prior to V3.20.08 firmware.
From 3.20.08 release notes:
PVP400-600, Removed the "system", "hidden" attributes from the
file ssfloat.bmp so that the customer can replace it when it is in the
\windows directory.
Back light Intensity and Screen Saver
For the screen saver bitmap image to be visible, the backlight intensity must be set above 0%. To change the backlight intensity of the PanelView Plus, go to "Terminal Settings" through the main configuration screen. Select "Display" and press enter. Select "Screen Saver." Change the backlight intensity using the arrow buttons.
To change the backlight intensity of the VersaView CE, follow the directions for the PanelView Plus, or open the "display" icon under Start-->Settings-->Control Panel. Click on the screen saver tab and change the backlight intensity.
Format of the Bitmap
- The bitmap can be of any complexity and size. However, a very complex bitmap will use more memory. Also, a bitmap that has a large resolution may either not fit on the screen or will not float around on the screen correctly and will appear sluggish. Therefore, it is suggested that the bitmap be as simple as possible and small compared to the screen size of the unit. Those screen resolutions are as follows:
PV+/VVCE Resolution 400/600 320 x 200 700/1000 640 x 480 1250 800 x 600 1500 1024 x 768 The lower left pixel of the bitmap is used for transparency. When the bitmap appears on the screen, any part of it that matches the lower left pixel will be transparent (i.e. if the lower pixel is black, anything black on the rest of the bitmap will not be visible on the screen).
If a portion of the bitmap is not appearing correctly, the pixel will need to be changed. This can be done on a computer that has Microsoft Paint installed on it. Once the bitmap is opened in Paint, zoom in to the lower left area (approximately 800%), and change the color using Paint tools.
Changing the Default Screen Saver Bitmap to a Custom Bitmap
Create a file on a desktop or laptop computer named autorun.bat. In the file place the following three lines (place the name of the custom bitmap in the place of "oem.bmp"):
copy \"Storage Card2"\oem.bmp \Windows\ssfloat.bmp
copy \"Storage Card2"\oem.bmp \"Storage Card"\Windows\ssfloat.bmp
pause
Place the file autorun.bat on a Compact Flash card and insert it into the external slot on the terminal. The autorun.bat file will automatically be run. Make sure the files are copied correctly by observing the Copied 1 file(s) messages. After completed, close the window by pressing a key or tapping on the X in the upper right.
If using a USB memory stick instead of a Compact Flash card, replace the term "Storage Card2" with "USB Storage" in the batch file. The autorun.bat will not fire on insertion of the USB. Cycle power with the USB storage device in the slot to fire the autorun.bat.
For PV+ 400 and 600 units, it is necessary to reset the terminal in order for the bitmap to be loaded into memory properly.
Return to the Default Screen Saver Bitmap
Create a file on a desktop or laptop computer named autorun.bat. In the file place the following two lines:
del \Windows\ssfloat.bmp
del \"Storage Card"\Windows\ssfloat.bmp
pause
Place the file autorun.bat on a Compact Flash card and insert it into the external slot on the terminal. The autorun.bat file will automatically be run. After completed, close the window by pressing a key or tapping on the X in the upper right.
For PV+ 400 and 600 units, it is necessary to reset the terminal in order for the bitmap to be erased from memory properly.
Alternate Method on VersaView CE Terminals
Another way to change the screen saver bitmap on the VersaView CE is to use the Control Panel. Go to Start-->Settings-->Control Panel and double click the Display icon. Click on the Screen Saver tab, then click on Browse, near the bottom of the window. Use the explorer window to browse to the location of the new bitmap (for example, the compact flash card would be under "Storage Card 2." Select the bitmap and press open. Make sure that the backlight intensity is set to a value greater than 0. Click OK.